Quantcast
Channel: IT-Idea
Viewing all 62 articles
Browse latest View live

Ever tried to update a user subtype from code?

$
0
0

User subtypes are one of the many new and nice things in SharePoint 2010.
The other day I was editing user profiles and changed the subtype for this profile in code. After changing the user subtype Commit() was called and I thought I was done.
But then it just started, because the user profile wasn’t updated at all. No exception, no message at all, just the old user subtype.
The used code:

ProfileSubtypeManager psubm = ProfileSubtypeManager.Get(context);
ProfileSubtype newSubtype = psubm.GetProfileSubtype(newSubtypeName);
currentUserProfile.ProfileSubtype = newSubtype;
currentUserProfile.Commit();

Changing the user subtype in the UI really updated the setting, so it was time to debug the SharePoint UserProfiles assembly.
The short version of what the debugging session(s) told me:
A UserProfileUpdateWrapper was created with the following xml

<?xml version="1.0" encoding="utf-16"?>
<MSPROFILE>
 <PROFILE ProfileName="UserProfile">
 <USER NewUser="0" NTAccount="account" UserID="3db01e67-abb0-4946-8fa8-85943768cb79">

The next step is iterating through the user profile fields to check if the value ‘IsDirty’ aka the value has been changed. This is the only trigger to actually update a user profile.
When adjusting the user subtype from the UI a few properties are updated, even when they’re not changed. The final XML looks like the following:

<?xml version="1.0" encoding="utf-16"?>
<MSPROFILE>
 <PROFILE ProfileName="UserProfile">
 <USER NewUser="0" NTAccount="account" UserID="3db01e67-abb0-4946-8fa8-85943768cb79">
 <PROPERTY PropertyName="Assistant" Privacy="1" PropertyValue="" />
 <PROPERTY PropertyName="PictureURL" Privacy="1" PropertyValue="" />
 <PROPERTY PropertyName="SPS-TimeZone" Privacy="1" PropertyValue="" />
 </USER>
 </PROFILE>
</MSPROFILE>

and a real update of the user profile occurred.

To make the update work from code appearently another property has to be updated together with the change of subtype. After a test with an update of a random property, the user subtype was updated too.

Summary

Changing only the user subtype from code, does trigger the Commit() method, but doesn’t call the update profile, because no user profile property was changed. Use a dummy property to update every time the user subtype has changed.


Refinement panel character display limitation

$
0
0

Search refiners can contain managed metadata fields to refine the results. Sometimes the display mode of the values look a bit weird in the refinement panel.

Suppose a sitecolumn of a library is a managed metadata column bound to a global termset. The termset is the parent of a few terms and all of these terms have one or more children itself. A termtree.
The display format of the column is set to ‘Display the entire path to the term in the field’.
Managed metadata column

A few documents are uploaded to the library and the metadata column is set to one of the terms.
A full crawl is completed and the refinement panel shows the metadata refiner.
The refinement panel now looks like this:
Refinement panel with child terms

As can be seen, not the whole fieldvalue is displayed. That’s weird. How do I know which one to use if not the whole value can be seen?
Maybe it’s a css issue or the left column of the screen isn’t wide enough? Starting up Firebug and checking out the value:
Firebug shows value

The whole value isn’t present as text to display in the panel! I was seriously surprised!
SharePoint returns only the first 19 characters and three dots…

But… hover over de terms and the whole path is displayed. But that’s not a satisfactory solution, the values have to be displayed properly!

Ok, I agree displaying the whole term tree path isn’t that useful in this case, but it’s needed somewhere else in the site, so the display format of the site column has to stay ‘Display the entire path to the term in the field’.
It would be great to have on option to show only the last term value despite the column display format. An excellent configuration place would be an extra attribute in the filter categories definition xml.

Displaying the last term value

The xslt of the refinementpanel can be adjusted to display the last term value now we know the tooltip does know the whole value.

Original xslt:

 <a href="{$SecureUrl}" title="{$RefineByHeading}: {$UrlTooltip}">
  <xsl:value-of select="Value"/>
 </a>

The new xslt looks a little bit different than that.
First the fieldvalue has to be analyzed if it contains ‘:’. The ‘:’ means the value is a child term and the whole tree path is displayed.
From the value which contains the whole tree path the last term is filtered by a recursive xslt template ´substring-after-last´.
Then a check has to be performed if the last term value contains the three dots. If it does, the last term value should be taken from the tooltip value, because the xslt Value doesn’t contain this value. Confusing, isn’t it?

<xsl:variable name="PartOfValue">
 <xsl:call-template name="substring-after-last">
  <xsl:with-param name="string" select="Value" />
  <xsl:with-param name="delimiter" select="':'" />
 </xsl:call-template>
</xsl:variable>

<xsl:variable name="PartOfTooltip">
 <xsl:call-template name="substring-after-last">
  <xsl:with-param name="string" select="$UrlTooltip" />
  <xsl:with-param name="delimiter" select="':'" />
 </xsl:call-template>
</xsl:variable>

<xsl:choose>
 <xsl:when test="($FilterCategoryType = 'Microsoft.Office.Server.Search.WebControls.TaxonomyFilterGenerator') and ($PartOfValue != '')">
  <xsl:if test="not(contains($PartOfValue, '…'))">
   <xsl:value-of select="$PartOfValue"/>
  </xsl:if>
  <xsl:if test="contains($PartOfValue, '…')">
   <xsl:value-of select="$PartOfTooltip"/>
  </xsl:if>
 </xsl:when>
 <xsl:otherwise>
  <xsl:value-of select="Value"/>
 </xsl:otherwise>
</xsl:choose>

If the fieldvalue contains less than 19 characters, no dots are displayed and the value can be used, but in that case the urltooltip is empty… To solve an empty tooltip, check out my next post.

After the xslt has been implemented the refinementpanel looks like the picture below
Adjusted refinementpanel

And the tooltip displays the whole term tree:
Tooltip

SharePoint returns only the first 19 characters, so what happens when a term itself exists of 19 or more characters?
Refinement panel with long term

On the one hand it’s great the 19 character limitation of displaying a whole termtree isn’t applied to this term, on the other hand, it doesn’t look very nice when the text continues outside the refinement panel.

Summary

The values of the refinement panel have a 19 character display limit. When displaying a whole termtree it’s likely this limitation will be exceeded. Just a few xslt adjustments are necessary to display the fieldvalues correct again.

Empty tooltip in refinement panel

$
0
0

Sometimes when hovering over a fieldvalue in the refinementpanel the tooltip displays only ‘Refine By:’ without displaying any value.
EmptyTooltipRefinementPanel

While another displays an actual value:
Actual term in a tree

or just a ‘parent’ term
Parent term

Why?

When the fieldvalue is less than 19 characters the tooltip stays empty. Well empty.. it displays ‘Refine By:’. Every fieldvalue with more than 19 characters is displayed in the tooltip. A ‘parent’ term or a whole path.

How to solve?

This behavior can be solved by adjusting the xslt.

Original xslt:

<a href="{$SecureUrl}" title="{$RefineByHeading}: {$UrlTooltip}">
<xsl:value-of select="Value"/>
</a>

Adjusted xslt:

<xsl:variable name="UrlTooltipAdjusted">
 <xsl:call-template name="format-tooltip">
 <xsl:with-param name="tooltip" select="$UrlTooltip" />
 <xsl:with-param name="string" select="Value" />
 </xsl:call-template>
</xsl:variable>

<a href="{$SecureUrl}" title="{$RefineByHeading}: $UrlTooltipAdjusted}">
<xsl:value-of select="Value"/>
</a>

<xsl:template name="format-tooltip">
 <xsl:param name="tooltip" />
 <xsl:param name="string" />
 <xsl:choose>
 <xsl:when test="$tooltip != ''">
 <xsl:value-of select="$tooltip" />
 </xsl:when>
 <xsl:otherwise>
 <xsl:value-of select="$string" />
 </xsl:otherwise>
 </xsl:choose>
</xsl:template>

The ‘format-tooltip’ template checks if the tooltip is empty and replaces the tooltip value with the actual fieldvalue if so.
By doing this the tooltip will never be empty and will always show the value of the fieldvalue.
Tooltip shows value

Summary

Besides the fieldvalues also the tooltip values suffer from a character limitation. The values of the refinement panel have a 19 character display limit, the tooltip doesn’t display the value when the fieldvalue is less than 19 characters.
This and the previous post solve these issues by making minor adjustments to the OOTB xslt.

PowerShell Export-ModuleMember vs Export keys in manifest

$
0
0

In PowerShell there are two ways to export functions, cmdlets, variables and aliases from a script module file for use by the calling context:
1. By using Export-ModuleMember and specify what resources need to be exported like:
Export-ModuleMember -Function or Export-ModuleMember -Variable

2. By using a module manifest and specifiy what resources need to be exported like:
@{
….
FunctionsToExport = ‘ VariablesToExport = ”
….
}

By seeing this I got a little confused on which method to use and why: Export-ModuleMember or the manifest way, so it was time to dig into this matter.
By creating a small module, a manifest and a script file the different options can be tested.

Module (psm1)

In the module three functions, two with an alias and two variables are defined and exported:

$msgText = 'Hello world!'
$anotherVariable = 'more here'

function Say-HelloWorld() { Write-Host $msgText }
function Calc-Numbers([int] $a,[int] $b) { $a + $b }
function I-Am-Private() { Write-Host "private" }

Set-Alias Add Calc-Numbers
Set-Alias Hello Say-HelloWorld

Export-ModuleMember -Function Say-HelloWorld, Calc-Numbers
Export-ModuleMember -Variable msgText, anotherVariable
Export-ModuleMember -Alias Hello, Add

Manifest (psd1)

The export variables of the manifest are (default) set to ‘*’:

# Functions to export from this module
FunctionsToExport = '*'

# Cmdlets to export from this module
CmdletsToExport = '*'

# Variables to export from this module
VariablesToExport = '*'

# Aliases to export from this module
AliasesToExport = '*'

Script (ps1)

The script file imports the module and displays information about the module. This is an excellent way to test what resources are exported:

Import-Module ExportFunctions -Force
Get-Module -Name ExportFunctions | fl

Tests

Running this script results in the following output:

As can be seen two functions, the aliases and variables are exported as defined in Export-ModuleMember in the module.

The Export-ModuleMembers lines are now removed to test the default settings in the manifest file (all ‘*’ for the export keys). Running the same script now results in:

All the functions are exported, but none of the alias or variables. At first sight this seems a bit strange, because the generated comment of the export keys of the manifest say ‘ to export from this module’. This seems only the case for the functions.

TechNet documentation for FunctionsToExport key:

Specifies the functions that the module exports (wildcard characters are permitted) to the caller’s session state. By default, all functions are exported. You can use this key to restrict the functions that are exported by the module…

And the TechNet documentation for VariableToExport key:

Specifies the variables that the module exports (wildcard characters are permitted) to the caller’s session state. By default, all variables are exported. You can use this key to restrict the variables that are exported by the module…

The statement don’t differ, but the behavior is.

The ‘*’ at the FunctionsToExport key means the restriction is:

If Export-ModuleMember -Function in the module is used, the functions listed there are exported:
In module:

Export-ModuleMember -Function Say-HelloWorld, Calc-Numbers

In manifest:

FunctionsToExport = '*'

Result:

If Export-ModuleMember -Function is NOT used in the module and in manifest ‘*’ is used all functions are exported:

The ‘*’ at the VariablesToExport key means: By default none of the variables are exported, unless variables are exported by the Export-ModuleMember in the module.

In module: No Export-ModuleMember -Variable
In manifest:

VariablesToExport = '*'

Result:

In module: No Export-ModuleMember -Variable
In manifest:

VariablesToExport = 'anotherVariable'

Result:

In module:

Export-ModuleMember -Variable msgText, anotherVariable

In manifest:

VariablesToExport = '*'

Result:

In module:

Export-ModuleMember -Variable msgText, anotherVariable

In manifest:

VariablesToExport = 'anotherVariable'

Result:

Summary

The export keys in the manifest can be seen as an export override of the Export-ModuleMember used in a module. When testing this behavior with functions alone it can be confusing – at least it confused me – which method to use – manifest export key or Export-ModuleMember – to restrict function exports. When trying to control the exports of variables and aliases it all comes clear: export them in the module at all times!

PowerShell Export functions, variables and aliases with wildcards

$
0
0

In my previous post ‘PowerShell Export-ModuleMember vs Export keys in manifest‘ I wrote about ways to export various items from a module.

Trevor Sullivan read my post and suggested in his comment to analyze the use of wildcards to export functions, variables or aliases using the manifest file.

After trying this I got enthusiastic about it, read further…

As well in the manifest file as with the use of Export-ModuleMember in the module wildcards can be used.

This can be (very) helpful when naming the function in the module according to a certain structure.
In C# accessibility levels are used to restrict or limit access to certain methods. There is no such thing in PowerShell, but this can be achieved by (not) exporting the functions from a module. In C# reserved accessibility levels as public and private are used. We can use this ‘technique’ in PowerShell by naming the functions in a module according to a standard: use for example -public or _public at the end of a functionname or variable in a module and use the same string literal as wildcard to export functions.

Practically this means defining Export-ModuleMember in the module like:
Export-ModuleMember -Function “*”
Export-ModuleMember -Variable “*”
Export-ModuleMember -Alias “*”
to export all functions, variables and aliases.
Then restrict the exported items in the module manifest like:
FunctionsToExport = ‘*-Public’
VariablesToExport = ‘*_Public’
AliasesToExport = ‘*-Public’

Module (psm1)

$msgText_Public = 'Hello world!'
$anotherVariable = 'more here'

function Say-HelloWorld() { Write-Host $msgText }
function Calc-Numbers-Public([int] $a,[int] $b) { $a + $b }
function I-Am-Public() { Write-Host "Public" }

Set-Alias Add Calc-Numbers
Set-Alias Hello-Public Say-HelloWorld

Export-ModuleMember -Function "*" #Say-HelloWorld, Calc-Numbers
Export-ModuleMember -Variable "*" #msgText, anotherVariable
Export-ModuleMember -Alias "*"  #Hello, Add

Manifest (psd1)

# Functions to export from this module
FunctionsToExport = '*-Public'

# Variables to export from this module
VariablesToExport = '*_Public'

# Aliases to export from this module
AliasesToExport = '*-Public'

And the result:

Summary

In my previous post I wrote in the summary:
‘The export keys in the manifest can be seen as an export override of the Export-ModuleMember used in a module… When trying to control the exports of variables and aliases it all comes clear: export them in the module at all times!’

After analyzing the wildcard options to export I still agree on the above statements, but I would like to nuance it a bit: export all items in the module and restrict the exported items in the module manifest by using wildcards in the module manifest and using a naming convention when defining functions, variables and aliases.

When approaching exporting the items from a module as described above you can not forget to export a function, variable or alias, you just have to follow this naming convention.

Office 365 developer site – add or request an app

$
0
0

An Office 365 Developer Site is a preconfigured SharePoint 2013 Preview site that can be used to create, test, and deploy apps for Office and SharePoint.
This post is about a very small piece: adding an app.

From the Site Contents menu (or other places…) an app can be added.

The quick launch menu shows a couple of options:

  • Your Apps
    • Apps you can add
  • Manage Licenses
  • Your Requests
  • SharePoint Store

Default Apps You Can Add is selected, showing you.. the apps you can add! Be surprised. The default SharePoint lists and libraries are shown when you just started with this site collection.

Your Apps

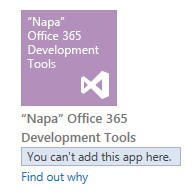
Your Apps shows all your apps, including the ones already installed. When there is something ‘wrong’ with the app SharePoint will tell you so. Let’s take a look at the “Napa” app.

It shows You can’t add this app here. And Find out why. The last sentence is a link and redirects you to the app properties(‘About’ the app or the App Details) which tells you why you can’t add the app: Good news – you already have this on your site.

Another option could be some prerequisites are missing (specified by the developer of the app), which would be the content of the message shown.

Manage Licenses

This item shows a list of apps to manage licenses for. When selecting an app details will be shown about license management, such as the user who purchased the app, people with a license, options to recover or remove the license, view the item in the SharePoint Store (public marketplace) and the license managers.

Your Requests

Your Requests has no actual use, beside searching for an app, which is standard available in the Add an app page, when appropriate governance controls aren’t enabled.

With appropriate governance controls I mean settings for App Purchases and App Requests available in SharePoint Administration Center. But before anything can be done about these settings an app catalog site collection has to be created.

In SharePoint Administration Center go to apps and select App Catalog. Here apps can be made available to the organization and requests for apps can be managed.
App Catalog ‘prescreen’:

Properties for the App Catalog Site:

Once the site collection has been created the  App Catalog ‘prescreen’ is not shown again when selecting the link, but the App Catalog site collection created earlier will be shown.

At Configure Store Settings (SharePoint Administration Center; apps) the App Purchases and App Requests can be managed.

With the above settings users are able to get apps from the SharePoint Store. When they go to the Store and find an app of their choice they can Add it.

When App Purchases are disabled users can request the app:

And fill out a simple form about user licenses and a justification.

After this, Your Requests, lists the requested app in a pending state.

In the App Catalog site collection the list App Requests lists the app requested:

With the Status column the user can keep track of the request. Once approved, the app can be installed and can be added by the user. The new app appears in the Your Apps section.

SharePoint Store

The SharePoint Store link redirects you to the store where all kinds of apps are listed, where you can search for a particular app or browse by category,  install or request an app dependent of the setting previously explained.

Summary

In this post I tried to explain some items available at Add an app and how you can add or request an app based on governance settings available in SharePoint Administration Center.

Office 365 Developer Site – Enterprise Preview

$
0
0

In my previous post I signed up for an Office 365 Developer Site to investigate some new functionalities of SharePoint 2013. After some browsing around I wanted to give another user different permissions to log in with and I realized the Developer Site is one license only.
Office 365 Enterprise Preview gives you 25 licenses, so…

Office 365 Enterprise Preview – Permissions on list type in an app

$
0
0

When developing an app for SharePoint permissions can be set on items in the host web, such as access to lists. The host web is the website to which an app for SharePoint is installed.

An app for SharePoint has its own identity and is associated with a security principal, called an app principal. Like users and groups, an app principal has certain permissions and rights. The app principal has full control rights to the app web so it only needs to request permissions to SharePoint resources in the host web or other locations outside the app web.

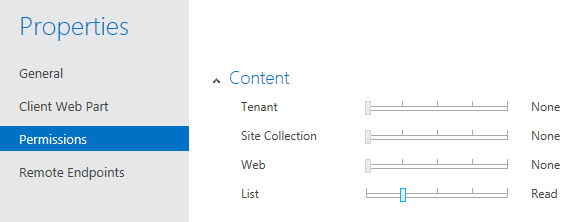
Using Microsoft Napa Office 365 Developer Tools these permissions can be set in the properties of the app using some kind of slider.

After installing the app this is the result:

The user can select one list out of all available lists the user has access to.

A better approach would be to help the user pick a specific (kind of) list, not letting the user pick from all lists in the web. This can be accomplished by editing the AppManifest in Visual Studio through a nice looking designer:

At the Permission requests section the column Properties a BaseTemplateId can be filled in to filter the lists the user can choose from. The BaseTemplateId is the numerical equivalent of the list base template, for example 100 represents a generic list, 101 a document library.

In xml this looks like:

  <AppPermissionRequests>
    <AppPermissionRequest Scope="http://sharepoint/content/sitecollection/web/list" Right="Read" >
      <Property Name="BaseTemplateId" Value="101" />
    </AppPermissionRequest>
  </AppPermissionRequests>

This results in the following list:

It looks like multiple properties can be defined, and you can:

but an additional BaseTemplateId won’t recognized and the filter of list types isn’t amended to the property settings.

You aren’t able to add another List scoped permission request in the designer, other scoped items can be added, also once per AppManifest.

The xml can be amended with another List scoped permission request, but only the first one defined is active.

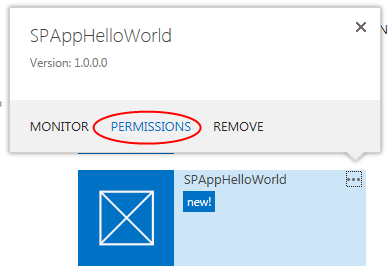
One gotcha: Once the app is installed and permissions link is selected there is no possibility to view the list its current permission setting. The first list in the dropdown is selected…

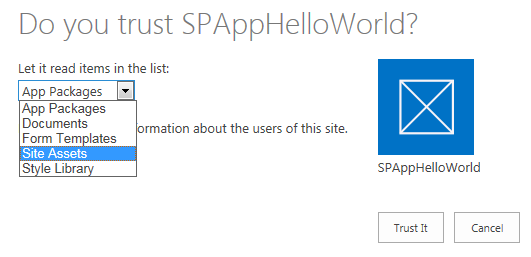
For example Trust library Site Assets:

Request permissions of the app:

And the first library is selected… hope Microsoft is going to fix this one…

Disclaimer: SharePoint 2013 is in preview at time of this writing, so things may change between now and release date.


Attempted to read or write protected memory. This is often an indication that other memory is corrupt.

$
0
0

Once in a while some annoying exceptions occur…

The exception

Exception in SearchBoxEx::CreateChildControls:System.TypeInitializationException: The type initializer for 'Microsoft.SharePoint.Portal.WebControls.LocStringIdLookupTable' threw an exception. ---> System.AccessViolationException: Attempted to read or write protected memory. This is often an indication that other memory is corrupt.
 at Microsoft.SharePoint.Portal.WebControls.LocStringIdLookupTable..cctor()

And the inner exception stack trace gave me more info:

at Microsoft.SharePoint.Portal.WebControls.StringResourceManager.ConvertLocStringIdToStringFast(LocStringId lsid)
 at Microsoft.SharePoint.Portal.WebControls.StringResourceManager.GetString(LocStringId lsid)
 at Microsoft.SharePoint.Portal.WebControls.SiteInfo.get_IsUICultureRTL()
 at Microsoft.SharePoint.Portal.WebControls.SearchBoxEx.CreateChildControls()

Investigation

So the exception occurred in the SearchBoxEx control, method CreateChildControls. Since this is a stack trace of standard SharePoint Server code I decompiled the standard SharePoint Server assemblies which I needed. This is necessary because this is no custom code belonging to an application we created. After analyzing the code it seems that when creating the SearchBoxEx control a context is created to build the control and its properties. During the creation of this context a SPSite and SPWeb are needed.
SharePoint is lacking to dispose these objects.
Another site is also using this SearchBoxEx control and no memory leaks have been reported here. The searchbox control used at this site is the same, but the context is different. The searchbox in this site uses its own SPWeb as context and this SPWeb object doesn’t need any disposal.

The SearchBoxEx control can be found at the top of the pages on the right hand side and in the Search center. The PeopleSearchBoxEx is a different control and doesn’t leak any memory.

How does the SearchBoxEx control get its context?

This is the code:


private SPWeb GetSpWeb()
{
  using (new SPMonitoredScope("SearchBoxEx.GetSpWeb"))
  {
    SPWeb personalWeb = null;
    if ((this.m_strCtxScopeFromGetOverride == SearchCommon.GetLocResourceString(LocStringId.SearchBox_ThisSite_Label)) && !string.IsNullOrEmpty(this.m_strSearchWithInUrlGetOverride))
    {
      if (this._PropertiesOverrideableBySite.EffectiveSearchResultPageUrl.EndsWith("/_layouts/OssSearchResults.aspx", StringComparison.OrdinalIgnoreCase))
      {
        personalWeb = SPContext.GetContext(HttpContext.Current).Web;
      }
      if (personalWeb == null)
      {
        SPSite site;
        try
        {
          site = new SPSite(this.m_strSearchWithInUrlGetOverride);
        }
        catch (FileNotFoundException exception)
        {
          site = null;
          ULS.SendTraceTag(0x66673974, ULSCat.msoulscat_SEARCH_Query, ULSTraceLevel.Medium, string.Concat((string[]) new string[] { "The SearchBox was passed an invalid site url in the query parameter: url={", this.m_strSearchWithInUrlGetOverride, "} Exception Detail: message={", exception.get_Message(), "} name={", exception.get_FileName(), "}" }));
        }
        if (site != null)
        {
          personalWeb = site.OpenWeb();
        }
      }
    }
    if (personalWeb == null)
    {
      if (this.Page is MySitePublicWebPartPage)
      {
        IPersonalPage page = this.Page as IPersonalPage;
        personalWeb = page.PersonalWeb;
      }
      if (personalWeb == null)
      {
        personalWeb = SPContext.GetContext(HttpContext.Current).Web;
      }
      if (personalWeb == null)
      {
        throw new ArgumentNullException("SPSite is null. No contextual scopes will be added");
      }
    }
    return personalWeb;
  }
}

The code explicitly checks if the result page ends with “/_layouts/OssSearchResults.aspx” to use the current context or to create an SPSite/SPWeb.

The personalWeb in the above code is returned by this method to the calling method but the SPSite site isn’t disposed!

This method returns the personalWeb to the calling method ‘HandleContextualScoping’. This SPWeb is used in the method, but not disposed!

Summary

Oeps.

Microsoft, would you be so kind to fix this?

The value of the property ‘SearchEnsureSOD’ is null or undefined, not a Function object

$
0
0

Fixing bugs is the nicest thing to do!
The javascript exception was thrown by a page:

The value of the property ‘SearchEnsureSOD’ is null or undefined, not a Function object

by just clicking in the page…

Hmm, according to the name of the function it seemed it has something to do with search and after investigating the page it seemed there was a custom Coreresults webpart on the page when there was no searchbox on the same page…
To make sure this was it I added a searchbox to the masterpage and the javascript exception didn’t occur again.

No big deal, just checked the difference in script files loaded with the developer tools between the page where the error occurred and a page where the searchbox was present: search.js is missing.

After adding a reference to the search.js file in the masterpage another exception was thrown when the page loaded:

The value of the property ‘NotifyScriptLoadedAndExecuteWaitingJobs’ is null or undefined, not a Function object

Ok, this function is defined in init.js, which actually was loaded already…

Maybe init.js was loaded later than the function NotifyScriptLoadedAndExecuteWaitingJobs was called. Just to be sure a reference to init.js was added in the masterpage and the initial exception was thrown again:
The value of the property ‘SearchEnsureSOD’ is null or undefined, not a Function object

It seemed the function SearchEnsureSOD wasn’t loaded when the body (body element in masterpage) was loaded. By adding a function to the _spBodyOnLoadFunctionNames array, the onload eventhandler of the body will execute each function loaded in this array. So by adding the SearchEnsureSOD function to this array it will run when the onload event of the body fires.

To be very minimalistic and a lazy programmer I added an empty SearchEnsureSOD function to the _spBodyOnLoadFunctionNames array:

<script language="javascript" type="text/javascript">
function SearchEnsureSOD() {
}
_spBodyOnLoadFunctionNames.push('SearchEnsureSOD');
</script>

and the javascript error didn’t occur again.

So what about deleting the reference to search.js? That won’t work, because this is the statement the error occurs on:

$addHandler(window.document.documentElement, 'click', function(evt){SearchEnsureSOD();SearchNavigate(evt);});//]]>

and it uses the function SearchNavigate, which is actually defined in search.js

So the full code to add to the masterpage:

<SharePoint:ScriptLink name="init.js" runat="server"/>
<SharePoint:ScriptLink name="/_layouts/search.js" runat="server"/>
<script language="javascript" type="text/javascript">
function SearchEnsureSOD() {
}
_spBodyOnLoadFunctionNames.push('SearchEnsureSOD');
</script>

On a search result page the function is defined as:

function SearchEnsureSOD() {
   EnsureScript('search.js',typeof(GoSearch)); }
_spBodyOnLoadFunctionNames.push('SearchEnsureSOD');

Where GoSearch is present when the searchbox control is.

Summary

The Coreresults webpart is a great thing, but it apparently needs some work when there is no searchbox present at the page. In this post the solution is provided to make it all work.

How to show column properties on a pagelayout

$
0
0

When digging around in the SharePoint WebControls on showing some field properties on a pagelayout I found some interesting stuff.

FieldDescription

First of all I thought the SharePoint webcontrol ‘FieldDescription’ would show the description of the field. At MSDN the FieldDescription class was described as

‘Represents the description metadata of a field.’

Any context is missing here.
After looking around a little bit more some context was found at the description of the Render method:
This member overrides TemplateBasedControl.Render(HtmlTextWriter).
Ah, so this webcontrol is used in template based controls. In the SharePoint root folder some references to this control were found in DefaultTemplates.ascx and SharePoint_Publishing_defaultformtemplates.ascx.
Stubborn as I am I just put this control on a page layout to check if anything will be rendered, but nothing was.

FieldProperty

The FieldProperty control

‘Represents a property of a field; that is, a column, on a list.’

This is what I’m actually looking for!
The control is very easy to use:

<SharePointWebControls:FieldProperty FieldName="Title" PropertyName="Required" runat="server" />

The FieldName is the static (internal) field name and the PropertyName can any of the properties of a field.
The FieldProperty control will return the values set in the UI or in XML, dependent on how the field is created.

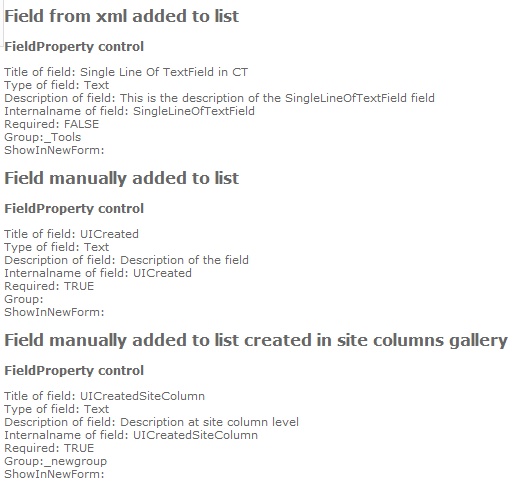
In the picture below the results are shown of the property values of three columns:

  • SingleLineOfTextField: single line of text field, created in xml, not required, created in a group, ShowInNewForm set to TRUE.
  • UICreated: single line of text field, manually created directly at list level, required
  • UICreatedSiteColumn: single line of text field, manually created in the site columns gallery and added to the list, required and stored in a group

The value of the ShowInNewForm attribute isn’t returned, so probably not all field elements can be used.

Summary

The FieldProperty control can be used to show values of field properties on a page, but not all. In the above example the ShowInNewForm isn’t exactly useful to show on a page, but ok.
Be aware of the value of the description property returned: this is the value on the list, not the site columns itself.

SummaryLinks webpart and outgoing links

$
0
0

At a client I worked on migrating content from Tridion to SharePoint 2010. Data included links that had to be migrated to links in a SummaryLinks webpart.
For another feature of the project the outgoing links of a page were used to do something with it. After migrating the content to a SummaryLink webpart the code of the feature mentioned there were no outgoing links on the page. The SharePoint Content and Structure can show Related Resources on a page, which includes outgoing links. This overview didn’t show the links either.

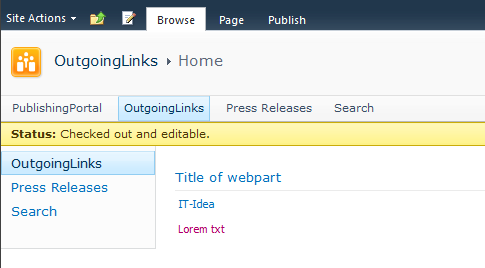
Figure 1 – SummaryLinks webpart with some links

Figure 2 – No outgoing links shown in the overview

After editing the page by making some changes to the SummaryLinks webpart the outgoing links started to appear in the Content and Structure overview.

Figure 3 – Outgoing links are shown

At this point is was obvious SharePoint did something to the webpart when modifying it from the UI, which was missing or didn’t fire when adding the webpart with links from code.

Time to start SharePoint Manager to see what’s going on by comparing the settings of two summarylinks webparts: one which was added programmatically and one which was fully configured by the UI.

Figure 4 – Webpart on the left was added programmatically, on the right configured by UI

The first thing I did was comparing the xml of the two webparts. There were some changes, but these were related to the fact the webparts were placed in another webpart zone, had another title and another link set.

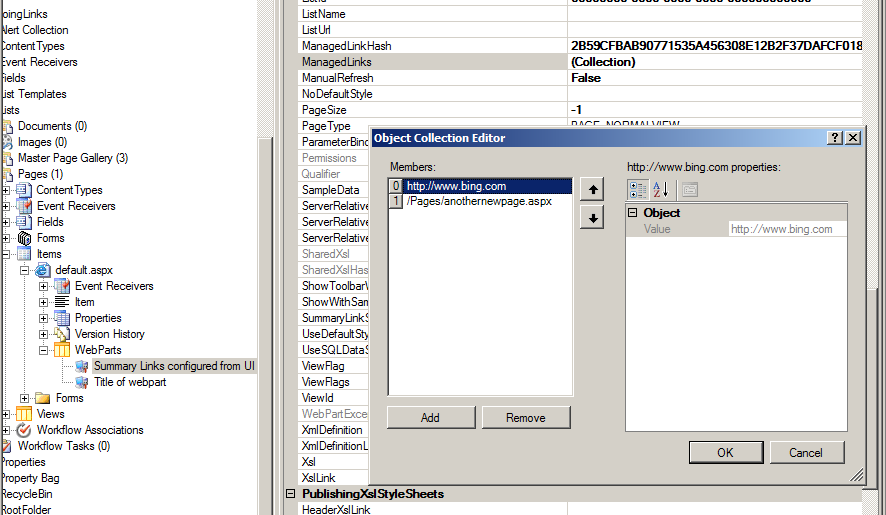
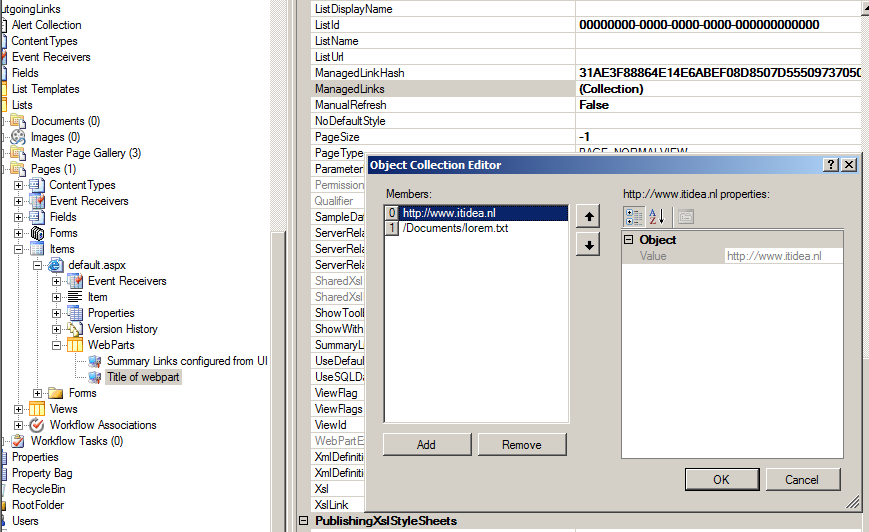
The next thing was to put two windows in SharePoint Manager next to each other and do some comparison of the properties set. After some quick scrolling I noticed the ManagedLinkHash was populated with a GUID at the webpart which was configured from the UI and this property was empty at the webpart which was programmatically added to the page. Besides the difference at the ManagedLinkHash property also the ManagedLinks collection was different between the two webparts: The collection was empty for the webpart added programmatically to the page.

Figure 5 – Properties of webpart (configured in UI) in SharePoint Manager

Figure 6 – Properties of webpart (added programmatically) in SharePoint Manager

These two properties are internally used by SharePoint to determine changes in the link targets of the SummaryLinks webpart.
The ManagedLinkHash is a hash of the saved ManagedLinks links and is used to quickly determine if the ManagedLinks have been modified by the system since the last time that they were saved, quite neat actually.
The ManagedLinks property stores the url’s of the SummaryLinks (stored in the SummaryLinkStore property) so they can be updated by the Web Part framework if the link targets move within the SharePoint site.
The code to add the links to the SummaryLinks webpart including setting the ManagedLinks property:

SummaryLink link = new SummaryLink("IT-Idea");
link.LinkUrl = "http://www.itidea.nl";
SummaryLink linkwithinSP = new SummaryLink("Lorem txt");
linkwithinSP.LinkUrl = "http://sp2010/Documents/lorem.txt";
SummaryLinkFieldValue sumlinks = new SummaryLinkFieldValue();
sumlinks.SummaryLinks.Add(link);
sumlinks.SummaryLinks.Add(linkwithinSP);
wp.SummaryLinkValue = sumlinks;

//add the links to the managedlinks array for automatic link updates by SharePoint
foreach (SummaryLink item in sumlinks.SummaryLinks)
{
 wp.ManagedLinks.Add(item.LinkUrl);
}

The ManagedLinkHash is generated of the links added to the SummaryLinks webpart.

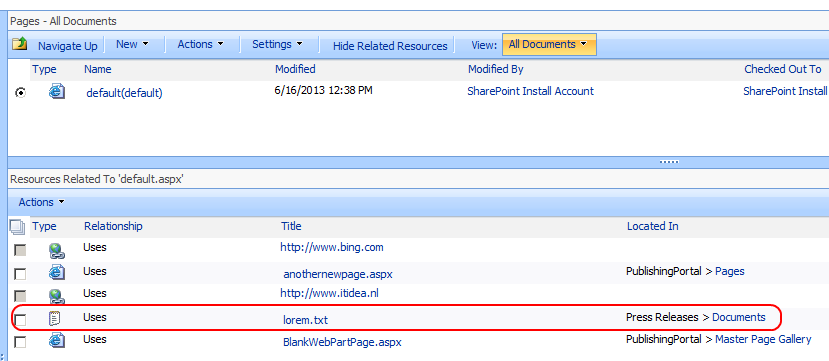
The result on the page stays the same, but the Content and Structure and SharePoint Manager will display the links correctly:

Figure 7 – Related resources overview in Content and Structure shows links

Figure 8 – Properties in SharePoint Manager show links

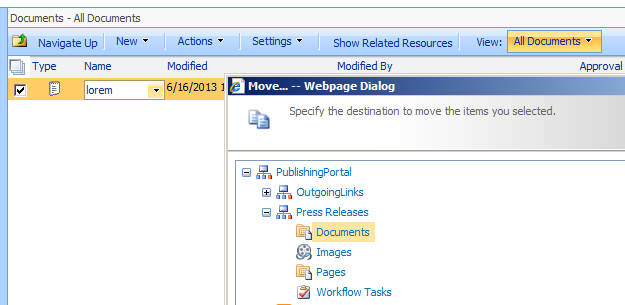
When the document will be moved to another library:

Figure 9 – Moving a document to another location

The ManagedLinkHash, ManagedLinks and the SummaryLink will be instantly updated.
SummaryLink change can be seen in the Content and Structure overview:

Figure 10 – Link changes shown

The changes to the ManagedLinkHash and ManagedLinks properties can be seen in SharePoint Manager:

Figure 11 – SharePoint Manager view

Summary

Sharepoint keeps administration about the linked objects in the SummaryLinks webpart. Make sure you do to!

Content By Query webpart

$
0
0

Recently I was fixing a bug which occurred at a custom webpart derived from the Microsoft.SharePoint.Publishing.WebControls.ContentByQueryWebPart.

The custom webpart has an EditorPart where the user is able to set some properties and after configuration the webpart shows an item from a list with custom formatting. Not too exciting.

The customer reported an error occurred every time the properties where set and he selected ‘Apply’ and ‘Save’ or ‘Publish’. After returning from the error page to the page with the webpart on it he pressed ‘Save’ or ‘Publish’ again and the page was saved or published successfully.

The first thing is to start analyzing the ULS log messages belonging to the correlation id which belongs to the exception. The first unexpected exception:

‘Creating object wrapper, expecting major version, but no major version given.  URL is /xxxx’

followed closely by the message

‘Trying to store a checked out item (/xxx.ASPX) in the object cache.  This may be because the checked out user is accessing the page, or it could be that the SharePoint system account has the item checked out.  To improve performance, you should set the portalsuperuseraccount property on the web application’

Three things to check:

  1. the checked out user is accessing the page – well yes, that will be me configuring the page
  2. the SharePoint system account has the item checked out – no
  3. set the portalsuperuseraccount property on the web application – I already did, so no

And a lot of ‘ConsoleUtilies.GetContextualControlMode had no currentPage so the current SPWebPartManager mode cannot be retrieved.’ messages.

The categories these messages came from where Publishing and Publishing Cache, so I checked some of the cache policies applied to the site. To be sure it didn’t had to do anything with the cache configured in the solution, I moved the webpart to a clean SharePoint installation, but the same exception did occur.

The next unexpected exception:

‘System.Web.HttpException: Failed to load viewstate.  The control tree into which viewstate is being loaded must match the control tree that was used to save viewstate during the previous request.  For example, when adding controls dynamically, the controls added during a post-back must match the type and position of the controls added during the initial request.’

Ah, the viewstate was changed during the postback. But I couldn’t find anything in the code which would be responsible for that, except…

The QueryOverride property was set in the EditorPart when configuring the webpart and this property wasn’t available in the .webpart file.

When the QueryOverride property is set SharePoint adds a new label to the toolpane with the message ‘Some properties in this Web Part are not available because they are configured to have fixed values’:

The message is fine, because that’s the purpose of the QueryOverride property, but the label changed the viewstate, because the QueryOverride wasn’t set at the initial loading state of the webpart, and occurred the exception.

To solve this issue the QueryOverride property has to be set before the first time the viewstate is loaded. Afterwards it can be changed to another value, which will happen because this webpart changes the QueryOverride when a user changes one of the properties of the webpart.

To set the QueryOverride property before the viewstate is loaded there are two option: set the property in the OnInit event or add the property to the .webpart definition file.

OnInit event

Only set a sort of dummy property value when the QueryOverride property is empty.

protected override void OnInit(EventArgs e)
{
  base.OnInit(e);

  string baseOverride = "<Where><Eq><FieldRef Name='ID'/><Value Type='Counter'>0</Value></Eq></Where>";
  if (this.QueryOverride.Equals(string.Empty))
  {
    this.QueryOverride = baseOverride;
  }
}

Webpart definition file

Add a dummy QueryOverride property to the xml file.

<property name="QueryOverride" type="string">&lt;Where&gt;&lt;Eq&gt;&lt;FieldRef Name='ID'/&gt;&lt;Value Type='Counter'&gt;0&lt;/Value&gt;&lt;/Eq&gt;&lt;/Where&gt;</property>

Summary

Sometimes the content query webpart is somewhat inconvenient and you’ll have to implement some fixes to get around it.

Of the two possible solutions provided for this inconvenience there is no ‘best one’, but I prefer using the OnInit method, because developers including myself, are most of the time investigating the code before the accompanying definition files.

Both solutions add the label

to the toolpane right away and the viewstate won’t change during a postback.

Easy PowerShell script to list which account is used as System Account

$
0
0

For each webapplication in a farm the account used as System Account can be set . When a user is logged in with this account ‘System Account’ is shown in the welcome menu:

And when the user adds or modifies an item the same display name is shown at the item:

To know which user account or accounts are used as System Account the user policies of each web application in Central Administration can be checked if the checkbox ‘Account operates as System’ has been checked for one or more of the users specified. If no users are marked here as System Account the application pool account of the webapplication is used as System Account.

Unfortunately there is no view somewhere to quickly determine the account(s) set as System Account.

Therfor I created a small PowerShell script to check the user policies of each web application. If there is a tick in the checkbox for one or more users these are displayed as System Account, otherwise the application pool account is listed as System Account.

$farmWebAppService = (Get-SPFarm).Services | ? { $_.typename -eq "Microsoft SharePoint Foundation Web Application" }

foreach($webApp in $farmWebAppService.WebApplications)
{
  Write-Host "Web application: " $webApp.Name
  $collection = @()
  foreach ($zonepol in $webApp.Policies)
  {
    if($zonepol.IsSystemUser -eq $true)
    {
      $collection += $zonepol;
    }
  }

  if($collection.Count -eq 0)
  {
    Write-Host "Account which operates as System (application pool account): " $webApp.ApplicationPool.DisplayName " - " $webApp.ApplicationPool.Username
  }
  else
  {
    foreach($item in $collection)
    {
      Write-Host "Account which operates as System (policy setting): " $item.DisplayName " - " $item.UserName
    }
  }
}

Output:

Web application: SP2010 – 80

Account which operates as System (policy setting): test user – spdev\testuser

Account which operates as System (policy setting): SharePoint Install Account – spdev\spinstaller

Web application: TeamSites

Account which operates as System (application pool account): AppPool_TeamSites – spdev\spintranet

Background of “What about ‘You must fill out all required properties before completing this action’ when Publishing a page”

$
0
0

In one of my posts I wrote a solution for the nasty popup error message:

This post provides some background information about this issue.

The ootb ribbon with its functionality is built out of the ribbon definition xml from the cmdui.xml file, script from the SP.Ribbon.js file and server side code from different assemblies. In this case we’re interested in the assemblies Microsoft.SharePoint and Microsoft.SharePoint.Publishing (in the above case publishing is enabled).
SharePoint loads a webcontrol SPPageStateControl at every wiki or publishing page. This control handles the ribbon buttons controlling the state of these pages:

this.commandHandlers[3] = new EditCommandHandler(this);
this.commandHandlers[0] = new SaveCommandHandler(this);
this.commandHandlers[1] = new SaveBeforeNavigateHandler(this);
this.commandHandlers[4] = new DontSaveAndStopCommandHandler(this);
this.commandHandlers[2] = new SaveAndStopEditCommandHandler(this);
this.commandHandlers[5] = new CheckinCommandHandler(this);
this.commandHandlers[6] = new CheckoutCommandHandler(this);
this.commandHandlers[7] = new OverrideCheckoutCommandHandler(this);
this.commandHandlers[8] = new DiscardCheckoutCommandHandler(this);
this.commandHandlers[11] = new PublishCommandHandler(this);
this.commandHandlers[12] = new UnpublishCommandHandler(this);
this.commandHandlers[9] = new SubmitForApprovalCommandHandler(this);
this.commandHandlers[10] = new CancelApprovalCommandHandler(this);
this.commandHandlers[13] = new ApproveCommandHandler(this);
this.commandHandlers[14] = new RejectCommandHandler(this);
this.commandHandlers[15] = new DeleteCommandHandler(this);
this.commandHandlers[0x10] = new UpdatePageStateCommandHandler(this);

The state of a page can be the page is

  • in display or edit mode
  • checked out to the current user, another user or to the system user
  • checked in
  • scheduled
  • rejected
  • pending approval
  • published
  • draft
  • not valid
  • and more

Based on these states
status messages can be displayed (like ‘Checked out and editable’, ‘Checked in and viewable by authorized users’ or a number of others).
error messages can be displayed (like ‘This page contains content or formatting that is not valid. You can find more information in the affected sections.’)
ribbon buttons can be trimmed
initial tab can be set

With this little background information about the SPPageStateControl the difference in validating required fields when saving or publishing a page directly can be investigated.

Save & Close

The command which handles the Save & Close button is the SaveAndStopEditCommandHandler. When this handler fires the page is validated by calling this.Page.Validate(). When one of the required fields on the page is left empty the page isn’t valid and an error condition is set and a status message is added with a message from a resource file.
The OnPreRender method of the SPStateControl populates the status messages based on the state of the page, in this case ‘Checked out and editable’ and ‘This page contains content or formatting that is not valid. You can find more information in the affected sections.’. These status messages and the error message are serialized and written to the page by script.

A serialized status message contains a StatusBody(text of the message), StatusTitle(‘Error:’ or ‘Status:’) and StatusPriority(‘yellow’).
A serialized error message consists of a Message, Title, ButtonCount, for each button a ButtonText and a ButtonCommand.

Client side the status and error messages are shown at initialization:

if (SP.Ribbon.PageState.NativeErrorState.ButtonCount > 0 || !SP.Ribbon.SU.$2(SP.Ribbon.PageState.NativeErrorState.ShowErrorDialogScript)) {
            SP.Ribbon.PageState.PageStateHandler.showErrorDialog();
        }
        SP.Ribbon.PageState.PageStateHandler.showPageStatus();

The error message, this is the popup!, will be shown when some of the properties like the ButtonCount and ShowErrorDialogScript are filled.
The Save & Close button added an error message with the following statement:

this.SetErrorCondition(msg, 0, null, null);
 

The SetErrorCondition is implemented as:

public void SetErrorCondition(string ErrorMessage, uint RemedialActionCount, string[] RemedialActionButtonText, string[] RemedialActionCommand)
{
this.errorTitle = SPResource.GetString("PageStateErrorTitle", new object[0]);
this.errorMessage = ErrorMessage;
this.remedialActionCount = RemedialActionCount;
this.remedialActionButtonText = RemedialActionButtonText;
this.remedialActionCommand = RemedialActionCommand;
}

This means the error message was added with only an error message, while the other properties were left empty. This is why the popup doesn’t show and only the status messages are.

Publish as first ‘save’action

The command which handles the Publish button is the PublishingPagePublishHandler. When this handler fires the separate required fields on the listitem are checked if they all have values. This differs from Save & Close which validates the page immediately by calling this.Page.Validate() without the explicit check for missing required fields.
The check for missing required fields loops through the FieldLinks of the ContentType to see if anything required is missing. If so, it builds up the edit properties url of the listitem to set as ButtonCommand on the errormessage it will format.
The call to SetErrorCondition differs from the call at Save & Close, all properties are now filled:

SetErrorCondition(Resources.GetString("MissingRequiredFieldsErrorMessage"), 2, new string[] { SPResource.GetString("PageStateOkButton", new object[0]), SPResource.GetString("ButtonTextCancel", new object[0]) }, new string[] { builder.ToString(), "SP.Ribbon.PageState.PageStateHandler.dismissErrorDialog();" });
 

The error message consists of the Message from resource file, Title from resource file, ButtonCount of 2 and for each button a ButtonText from resource: ‘OK’ and ‘Cancel’ and the ButtonCommands: builder.ToString() in this case ‘SP.Utilities.HttpUtility.navigateTo(‘/Pages/Forms/EditForm.aspx?ID=4&Source=%2FPages%2Ftest01%2Easpx’);’ for the ‘OK’ button and ‘SP.Ribbon.PageState.PageStateHandler.dismissErrorDialog();’ for the ‘Cancel’ button.

The OnPreRender method of the SPStateControl populates the serialized status and error messages based on the state of the page and at the end of the method script is added to the page, the same as at Save & Close.
SerializedPageStatusMessages method (serverside) populates ‘SP.Ribbon.PageState.ImportedNativeData.StatusBody and StatusTitle used in showPageStatus (client side)
SerializedErrorState (server side) populates PageErrorState (client side)
PageErrorState var (client side) is set to this.SerializedErrorState which builds an object which client script can handle (Message, Title, ButtonCount, ButtonText, ButtonCommand)
And SP.Ribbon.PageState.NativeErrorState is set to the PageErrorState.

Client side the status and error messages are shown at initialization:

if (SP.Ribbon.PageState.NativeErrorState.ButtonCount &gt; 0 || !SP.Ribbon.SU.$2(SP.Ribbon.PageState.NativeErrorState.ShowErrorDialogScript)) {
            SP.Ribbon.PageState.PageStateHandler.showErrorDialog();
        }
        SP.Ribbon.PageState.PageStateHandler.showPageStatus();

Where the ButtonCount is now 2

and the error dialog will be shown as a modal dialog:

Once the page has been saved with the required managed metadata field filled
When the page is saved with the required managed metadata field filled, set in edit mode again, empty the field and Publish the page, the result is different from the above: no popup error message is shown, all messages appear as status messages.
The code passes successfully the check for missing required field, because it still has the previous filled in value(!), then falls back on validating the page as with Save & Close. This one fails and the error message is added as a status message and the process continues as with Save & Close.

The popup error message is confusing for a lot of users, they don’t understand why this sometimes happens.
They read the message and press ‘Ok’ and they are navigated away from the page to the edit properties and then what. The field was on the page, why am I now on another page?

The solution can be found here.

Summary

With a few lines of code the nasty popup error message can be prevented to be displayed. The background story behind it is quite large, but important to understand. Be careful to never overwrite SharePoint message when publishing stuff, because it can lead to inappropriate behavior.


What about ‘You must fill out all required properties before completing this action’ when Publishing a page

$
0
0

When a required managed metadata (taxonomy) field is located on a pagelayout and this field is not filled with a value when publishing the page SharePoint will throw an error message in a popup with the text ‘You must fill out all required properties before completing this action’:

Where the OK button navigates to the edit properties url of the page.
This behavior only occurs when a page with a required managed metadata field is published before it’s successfully saved at least once.
When a page is saved and the required managed metadata field is empty an error message is displayed in the status bar and not as a popup:

Apparently the validation of required fields differ when saving the page from publishing the page.

Background information can be found here.

The popup error message is confusing for a lot of users, they don’t understand why this sometimes happens.
They read the message and press ‘Ok’ and they are navigated away from the page to the edit properties and then what. The field was on the page, why am I now on another page?

How to prevent to popup error message

To prevent the nasty popup some code is needed to check if there are any managed metadata fields on the page which are required and now empty when the Publish button is pressed.
When there are no required managed metadata fields on the page, there still can be required managed metadata fields at the listitem. In this case ootb SharePoint code is of course leading and no interference is needed: the popup error message will show and that’s exactly how it should work.
If there are, the SPPageStateControl will be questioned if there are any errors. When there are no errors nothing has to be done.
When there is an error, the popup can be skipped by calling ‘EnsureItemSavedIfEditMode(false);’ on the SPPageStateControl which validates the page by calling Page.Validate(), this results in an invalid page and the error message will be added to the status messages as with Save & Close.
No other code is skipped from the process other than the nasty popup and the code is quite narrowed by the check if there are required managed metadata fields on the page.

A small control has to be created with the functionality described above and this has to be added to each pagelayout where it is appropriate to add.

[ToolboxData("<{0}:CustomValidationRequiredFieldsOnPage runat=server></{0}:CustomValidationRequiredFieldsOnPage>")]
public class CustomValidationRequiredFieldsOnPage : WebControl
{
 protected override void CreateChildControls()
 {
 base.CreateChildControls();

 if (SPContext.Current.FormContext.FormMode == SPControlMode.Edit)
 {
  bool arethere = AreThereAnyMissingRequiredFieldsOnPage();

  if (arethere)
  {
   //SPPageStateControl:
   //Provides an ASP.NET control that handles the Ribbon buttons controlling the state of a Microsoft SharePoint Server wiki or publishing page,
   //such as the CheckInCheckOutButton or the PublishingButton.
   SPPageStateControl baseParentStateControl = Page.Items[typeof(SPPageStateControl)] as SPPageStateControl;

   //Publish button: SPListItem MissingRequiredFields checks this.FieldHasValue(link.Name, field);
   //the field is empty (which is right) when the page is first created (MMD field is never filled in)
   //when the field was once filled, saved and emptied the field in sp code still has the previous value and the check MissingRequiredFields succeeds
   //after succeeding this check the page is validated (this.Page.Validate()) and this one fails which results SP validating the page as the Save button does

   if (baseParentStateControl.HasError)
   {
    //this overwrites the previous PageErrorState
    //and validates the page
    //no popup anymore and status updates in yellow area
    baseParentStateControl.EnsureItemSavedIfEditMode(false);
   }
  }
  else
  {
   //there are missing fields at this listitem, but they're not on the page
   //do nothing here, because the SerializedErrorState contains the navigate url to the Edit Properties page
   //and a message pops up
  }
 }
}

 /// <summary>
 /// Check if required fields are missing which are present at the page
 /// </summary>
 /// <returns></returns>
 private static bool AreThereAnyMissingRequiredFieldsOnPage()
 {
  foreach (Control control in SPContext.Current.FormContext.FieldControlCollection)
  {
   //get the control type
   string type = control.GetType().Name;

   FieldTypes controlType = (FieldTypes)Enum.Parse(typeof(FieldTypes), type);

   switch (controlType)
   {
    case FieldTypes.TaxonomyFieldControl:
     TaxonomyFieldControl tfc = control as TaxonomyFieldControl;
     if (!tfc.IsValid)
     {
      return true;
     }
     break;
    default:
     break;
   }
 }

 return false;
}

 enum FieldTypes
 {
 DateTimeField, FieldValue, TextField, RichImageField, NoteField, RichHtmlField, PublishingScheduleFieldControl, TaxonomyFieldControl, BooleanField, ComputedField
 }
}

If you want you even can add your own error status message by calling

baseParentStateControl.AddErrorStatus("We have an error...");
 

You’re unable to create an error popup as SharePoint does, but in fact it’s just a modaldialog, so you can.

Summary

With a few lines of code the nasty popup error message can be prevented to be displayed. The background story behind it is quite large, but important to understand. Be careful to never overwrite SharePoint message when publishing stuff, because it can lead to inappropriate behavior.

Index Latency – my first app in the Office Store

$
0
0

Recently I submitted my first SharePoint app to the Office Store.

The app is called ‘Index Latency’ and it displays historical data about how long it took for new content to show up in search results in a graph. The raw data can be displayed in Excel Interactive View where it can be opened in Excel Web App, downloaded and analyzed further.
The functionality is exposed by a button in the ribbon in document and pages libraries.

After finalizing the app I submitted the app through the Seller Dashboard where informatie about the app such as title, version, category, logo, support documents, screenshots, licensing, and ofcourse the .app packages itself, had to be filled in.
The screenshots have to be 512w x 384h pixels, a bit of a peculiar size…

The status was updated to ‘pending approval’ and the waiting began…

After just 1,5 day I received an email from the Seller Dashboard Team with the info:
Changes recommended for app approval

That’s fair enough, I didn’t expect it to be approved right away.

After logging into the Seller Dashboard a report could be downloaded with details about the app and recommended changes.
The report contained in my case 2 screenshots where the app didn’t display any data in Internet Explorer 8 and 9 with the recommendation to fix it.

Before submitting the app I tested the app in several browsers as specified in Validation policies for the apps submitted to the Office Store section 4.12.
I tested the Internet Explorer versions with the help of the Developer Tools Emulation tab where the Document Mode section can be used to enulate older browsers. The app displayed data in all Internet Explorer versions, so I got a little confused since the report displayed no data for IE 8 and 9.
I kind of lost faith in the Document Mode emulation and I turned to Chrome and installed some extensions to switch browsers without any luck. Then I turned to BrowserStack and I found the issue in seconds. BrowserStack is just awesome, I must say, and no, I don’t get any money for this. Real browsers with preinstalled developer tools to interact with!

The issue was about ISO dates in the app. Once solved I resubmitted the app and it was approved in less than a day.

The report which is provided in the Seller Dashboard when changes are recommended, isn’t available after changes are made to the app info in the Seller Dashboard. I saw a typo in the app description and edited it. After this action the app is in draft status and the report link wasn´t available anymore. Be aware of this and download and save this report if you want to preserve it.

Submitting an app to the Office Store is quite straightforward, but some version history on app submission results and the report(s) would be nice.

Set up a SharePoint 2013 development environment in one hour

$
0
0

Sometimes you need a nice clean development environment. And you need it now!

With a Microsoft Azure subscription you can easily create a new virtual machine and set it up with SharePoint 2013, SQL Server and Visual Studio.

This post describes the steps to create a basic SharePoint 2013 environment.

Create the Virtual Machine

Log into your Azure account at https://manage.windowsazure.com

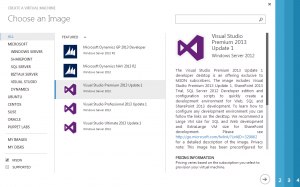
Create a new VM from gallery.

Here you can check the MSDN checkbox, but only if you’re logged into Azure with the account that is associated with an MSDN subscription, otherwise it will be disabled. This check box filters the list of VM’s to VM’s specific to MSDN subscribers.

In theory this list could be filtered to show only the Visual Studio VM’s you have a MSDN subscription for, but it doesn’t. Make sure you choose the right Visual Studio edition otherwise you end up with an expired trial version of Visual Studio in your VM for which you don’t have a product key.

When selecting one of the Visual Studio editions there will be a text at the right to explain what you’ll get:

The Visual Studio Premium 2013 Update 1 developer desktop is an offering exclusive to MSDN subscribers. The image includes Visual Studio Premium 2013 Update 1, SharePoint 2013 Trial, SQL Server 2012 Developer edition and configuration scripts to quickly create a development environment for Web, SQL and SharePoint 2013 development. To learn how to configure any development environment you can follow the links on the desktop. We recommend a Large VM size for SQL and Web development and ExtraLarge VM size for SharePoint development. Please see http://go.microsoft.com/fwlink/?LinkID=329862 for a detailed description of the image. Privacy note: This image has been preconfigured for Windows Azure, including enabling the Visual Studio Experience Improvement Program for Visual Studio, which can be disabled.

I selected Visual Studio Premium.

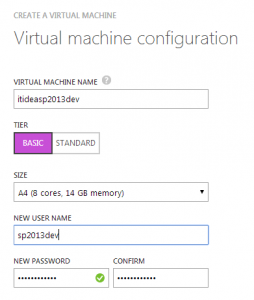
At the next screen a few fields have to be filled in:

  • Virtual machine name – enter a name of your choice
  • Tier – this setting can save you some money, I’ll explain it later
  • Size – choose a size of the VM
  • Username – willl be needed to login by RDP
  • Password – will be neededto login by RDP

Tier and size need some additional explanantion.

Tier

You can choose between Basic and Standard tier. Both have similar configurations in size, but the Standard tier does include load-balancer and auto-scaling. For development purposes this is probably not a requirement and Basic tier is an excellent choice.

A Basic tier ExtraLarge Windows VM costs at the time of writing € 0,447/hr, the same configuration in Standard tier costs € 0,537/hr. By choosing the Basic tier you will save about 20% on your VM costs.

You are able to switch the tier after creating the VM if you change your mind about it.

Size

Microsoft recommends an ExtraLarge VM size for SharePoint development, but the choices in the list all start with ‘A’ followed by an number.

The mapping:

  • A0 – extra small
  • A1 – small
  • A2 – medium
  • A3 – large
  • A4 – extra large: 8 CPU cores, 14 GB of memory

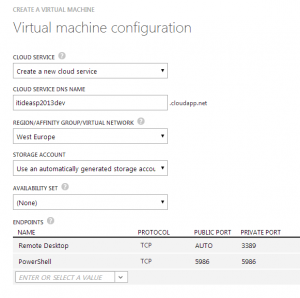
After filling in the field select the arrow and the next step of the configuration will appear. Here I change the region to West Europe and kept the defaults for the other fields.

The last VM configuration screen allows you to install the VM agent and some extensions.

The VM Agent is used to install and manage extensions that help you interact with the virtual machine. For example, when you can’t access the guest OS because of a forgotten password, an extension can help you change the password.

So I recommend to install the VM Agent.

After selecting the ‘check-mark’ button the VM and the cloud service will be created and started. In my case it took about 5 minutes to complete.

Once completed, you can select ‘Connect’ at the bottom of the screen and the .rdp file will be downloaded to your machine. Or you can start the RDP client and use the DNS name with the Remote Desktop public port to connect to the VM. Use the username and password when configuring the VM to login.

Create the SharePoint environment

Once you’re in the VM you’ll find a folder ‘ConfigureDeveloperDesktop’ on the desktop. In here a Scripts folder is located with 3 PowerShell scripts.

ConfigureSharePointFarm

  • Provisions SQL server
  • SP2013_Configuration database
  • Central Administration
  • Web application
  • Root site collection

ConfigureSharePointFarmInDomain

  • All of the above
  • Assumes you have a VM as domain controller in the same virtual network as the Visual Studio VM

ConfigureSQLServer

  • Provisions SQL Server

The easiest option is the first one, ConfigureSharePointFarm. It takes farm account and password as parameters and off you go. The account doesn’t has to exist, the script will create it for you in that case.

After about 50 minutes the script completes and a SharePoint development environment, including Visual Studio, is up and running.

SharePoint is installed as a trial, so it’s probably a good idea to use your product key to fix this.

Visual Studio is installed without a license, this can be fixed by signing in with the account associated with an MSDN subscription or by using your product key.

But what do you actually get?

A SharePoint installation with March 2013 Public Update installed.

You can add service applications as you like and need, by default ‘Application Discovery and Load Balancer Service Application’ and ‘Security Token Service Application’ are set up.

Summary

In about one hour you are able to set this up and it is really easy to do and for quick development work this will probably be fine.

If you want more control and initially setting up things like the service applications, acccounts, log locations, etc, I recommend using for example the AutoSPInstaller from CodePlex. If you don’t want a stand alone machine you can always set up a virtual network, AD, SQL and a separate SharePoint VM, also in Azure.

Cloned VM slow due to Distributed Cache issues in SharePoint 2013

$
0
0

Recently I worked on a SharePoint 2013 VM for development purposes. This cloned VM contained 16 GB of memory which isn’t a lot for a SP2013 environment. To be able to work with the VM at a certain speed the Search service was stopped, but that didn’t speed up things as I was hoping for.

Since we’re using VMWare the next thing was to check ‘Reserve all guest memory (all locked)’. This worked like a charm, even with the Search enabled, just for a very short time… I started to monitor the ULS. At once I noticed issues with the Distributed Cache, like

  • There is a temporary failure. Please retry later. (One or more specified cache servers are unavailable, which could be caused by busy network or servers. For on-premises cache clusters, also verify the following conditions. Ensure that security permission has been granted for this client account, and check that the AppFabric Caching Service is allowed through the firewall on all cache hosts. Also the MaxBufferSize on the server must be greater than or equal to the serialized object size sent from the client.). Additional Information : The client was trying to communicate with the server : net.tcp://<servername>:22233
The servername in the above message wasn’t the name of the machine I was working on, it still pointed to the machine from which this one is a clone.

Checking the available cache host with PowerShell confirmed this:

#Set context to cluster
Use-CacheCluster
#List all cache host services present in cluster
Get-CacheHost

The cache host service listed will be the one at the ‘old’ server in an UNKNOWN service state, like:

HostName : CachePort         Service Name                                Service Status

——————–                         ————–                                          ————

<old_server>:22233              AppFabricCachingService            UNKNOWN

Since a cache cluster is present the current server can be added as a cache host:

#Stop the distributed cache service instance
Stop-SPDistributedCacheServiceInstance -Graceful
#add the server as a cache host
Add-CacheHost -ConnectionString "Data Source=<new_server>;Initial Catalog=SP_CONFIG;Integrated Security=True;Enlist=False" -ProviderType "SPDistributedCacheClusterProvider"

The connection string can be found in:

  • HKEY_LOCAL_MACHINE\SOFTWARE\Microsoft\AppFabric\V1.0\Configuration

There were multiple cloned servers which had to be fixed and sometimes this message appeared:

Service is already configured on this host.

Then run Remove-CacheHost to unconfigure it and proceed with the next steps.

The next step is to register the server as a cache host:

#register the server as a cache host
Register-CacheHost -ConnectionString  "Data Source=<new_server>;Initial Catalog=SP_CONFIG;Integrated Security=True;Enlist=False" -ProviderType "SPDistributedCacheClusterProvider"
#Check if cache host is registered successfully
Get-CacheHost

Now 2 cache hosts are listed:

HostName : CachePort            Service Name                      Service Status

——————–                              ————–                              ————

<old_server>:22233              AppFabricCachingService     UNKNOWN

<new_server>:22233            AppFabricCachingService     DOWN

The configuration of the cache cluster has to be exported and adjusted to remove the old server and add the new server:

#stop the cluster
Stop-CacheCluster
#If result:
#Invalid operation encountered on <old_server>:AppFabricCachingService : Cannot open
#Service Control Manager on computer '<old_server>'. This operation might require other privileges
#and/or
#No hosts running in cluster
#Just proceed: unable to connect to old_server which makes sense

#export the cluster configuration so changes can be made
Export-CacheClusterConfig D:\CODE\clusterconfig.xml

The cluster configuration file needs to be modified. The old server reference has to be deleted, while the new server reference has to be added when registering the cachehost

Part of exported and modified configuration:

<hosts>
<host replicationPort="22236" arbitrationPort="22235" clusterPort="22234" hostId="114149731" size="819" leadHost="true" account="<account>" cacheHostName="AppFabricCachingService" name="<old_server>" cachePort="22233" />
<host replicationPort="22236" arbitrationPort="22235" clusterPort="22234" hostId="1975933372" size="8191" leadHost="true" account="<account>" cacheHostName="AppFabricCachingService" name="<new_server>" cachePort="22233" />
</hosts>
#import the modified cluster configuration
Import-CacheClusterConfig -file D:\CODE\clusterconfigmodified.xml
#Start the cluster
Start-CacheCluster
#and check if the service is UP
Get-CacheHost

Check if the service status of the new server is UP and the old server isn’t listed as cache host anymore

HostName : CachePort            Service Name                      Service Status

——————–                           ————–                              ————

<new_server>:22233            AppFabricCachingService     UP

Check if AppFabric Cache service is started in Services and in Central Administration.

In the ULS the following messages appeared:

Calling… SPDistributedCacheClusterCustomProvider:: BeginTransaction
Successfully executed… SPDistributedCacheClusterCustomProvider:: BeginTransaction

    And SharePoint is responding quite a lot faster than before!

    Summary

    This post described how to fix Distributed Cache service issues on a cloned SharePoint machine where the cache host pointed to the ‘old’ server.

    There are different caches that depends on the Distibuted Cache service: Login Token Cache, Feed Cache, Last Modifed Cache, Search Cache, Security Trimming Cache, View State Cache, and more. Therefor it’s quite important and convenient when the Distributed Cache service works properly.

    Search has encountered a problem that prevents results from being returned

    $
    0
    0

    ​When you see the following message displayed in search related webparts or in the search centre:

    Search has encountered a problem that prevents results from being returned. If the issue persists Please contact your administrator

    Correlation ID:

    Or in Dutch:

    Bij het zoeken is een probleem opgetreden dat verhindert dat resultaten worden geretourneerd. Als het probleem zich blijft voordoen, neemt u contact op met de beheerder

    Correlation ID:

    The Search Administration shows a warning icon at the Index partition section:
    SearchService_SearchAdministration

    And in the ULS the following messages can be found:

    • Microsoft.Ceres.InteractionEngine.Component.FlowHandleRegistry : Exceptions occurred when evaluating the flow.  Microsoft.Ceres.Evaluation.DataModel.EvaluationException: Cannot plan query for index system SPd90968e26d35. Index fragment ’0′ has no available cells. Cell statuses: [Cell I.0.0 on node IndexComponent1: Cell status is set to 'not available' (cell out of sync or seeding)]   at Microsoft.Ceres.Evaluation.Engine.ErrorHandling.HandleExceptionRecordSetSink.DoWithTryCatch(IRecord record)  at Microsoft.Ceres.InteractionEngine.Component.FlowHandleRegistry.SubmitData(FlowExecutionInfo handle, InputData inputData, Stopwatch timer, String correlationId, Guid tenantId, String query, String flowName, Int32 queryTimeoutMillis)  at Microsoft.Ceres.InteractionEngine.Component.FlowHandleRegistry.ExecuteFlow(String flowName, InputData input, Int32 queryTimeoutMillis)
    • w3wp.exe: All query processing components are in ‘Failed’ status.
    • SearchServiceApplicationProxy::Execute–Error occured: System.ServiceModel.FaultException`1[System.ServiceModel.ExceptionDetail]: Tried IMS endpoints for operation Execute: Cannot plan query for index system SPd90968e26d35. Index fragment ’0′ has no available cells. Cell statuses: [Cell I.0.0 on node IndexComponent1: Cell status is set to 'not available' (cell out of sync or seeding)] (Fault Detail is equal to An ExceptionDetail, likely created by IncludeExceptionDetailInFaults=true, whose value is: Microsoft.SharePoint.SPException: Tried IMS endpoints for operation Execute: Cannot plan query for index system SPd90968e26d35. Index fragment ’0′ has no available cells. Cell statuses: [Cell I.0.0 on node IndexComponent1: Cell status is set to 'not available' (cell out of sync or seeding)] at Microsoft.Office.Server.Search.Query.Ims.LoadBalancer.RoundRobinLoadBalancerContext.NextEndpoint(String operationName, String failMessage)  at Microsoft.Office.Server.Search.Administration.SearchServiceApplication._ImsQueryInternalType.DoSpLoadBalancedImsOp[T](ImsBackedOperation`1 imsCall, Int32 timeoutInMilliseconds, Int32 wcfTimeoutInMilliseconds, String operationName)  at Microsoft.Office.Server.Search.Administration.SearchServiceApplication._ImsQueryInternalType.Execute(QueryProperties properties, Guid ssaId)   at Microsoft.Office.Server.Search.Administration.SearchServiceApplication.Execute(QueryProperties prope…).


    And the Event viewer shows something like this:

    Application Server Administration job failed for service instance Microsoft.Office.Server.Search.Administration.SearchServiceInstance (c15f488e-cc03-4274-a280-72e039cab353).

    Reason: An update conflict has occurred, and you must re-try this action. The object SearchDataAccessServiceInstance was updated by <user>, in the OWSTIMER (9208) process, on machine <machine>.  View the tracing log for more information about the conflict.

    Technical Support Details:
    Microsoft.SharePoint.Administration.SPUpdatedConcurrencyException: An update conflict has occurred, and you must re-try this action. The object SearchDataAccessServiceInstance was updated by <user>, in the OWSTIMER (9208) process, on machine <machine>.  View the tracing log for more information about the conflict.

    at Microsoft.Office.Server.Search.Administration.SearchServiceInstance.Synchronize()
    at Microsoft.Office.Server.Administration.ApplicationServerJob.ProvisionLocalSharedServiceInstances(Boolean isAdministrationServiceJob)

    Solution

    To solve the issue follow these steps:

    1. Stop the Timer Service
    2. Clear the configuration cache
      1. Find in \ProgramData\Microsoft\SharePoint\Config the folder where the file cache.ini exists
      2. Delete every file from this folder EXCEPT cache.ini
      3. Open cache.ini, delete the content and put ’1′ (without the quotes) in it and save the file
    3. Restart the Timer Service
    4. Index reset
    5. Full crawl


    And the Index Partition is healthy again!

    Viewing all 62 articles
    Browse latest View live